Introduction to UNIX/Emacs
Hello! The first thing you might have noticed about these
computers is that they don't have Windows or MacOS installed. And
you're right - they're running UNIX. But fear not! We'll get you
familiar with this new system in no time - by the end of the
semester, this stuff will feel like old hat.
The first thing you'll need to do is get an account form. You
can get one from the TA only if you're actually enrolled in the
section (i.e. you're not on the waitlist for the section). I'm
afraid we have to be quite strict about this - we only have limited
spots in each lab, so we have to give precedence to those students
that are enrolled.
Once you do have an account form, you'll see it has a username
and a password, that looks something like this:
Login: cs61a-ba
Password: 6z$ds4/
Head to an available machine, and log in.
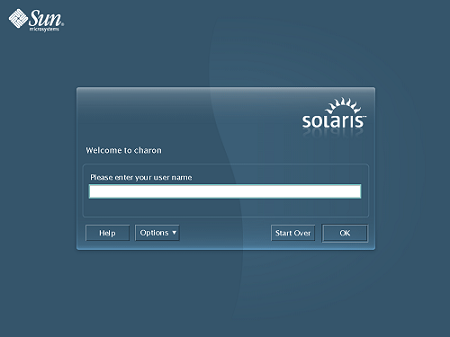
Figure 1: The Log-in Screen
Important: While typing in your password, don't be alarmed
by the fact that nothing shows up in the prompt. This is normal.
It's a security feature to prevent people looking over your
shoulder to peek at your password.
Once you log in, you'll see a registration window pop up,
asking for things like your Name, E-mail address, etc. Complete the
registration. If you make a typo (i.e. misspell your name), don't
worry, you can restart the registration program, first by completing
the registration process, and then typing
re-register at the prompt and hitting enter.
Finally, you'll see a window that looks something like this:
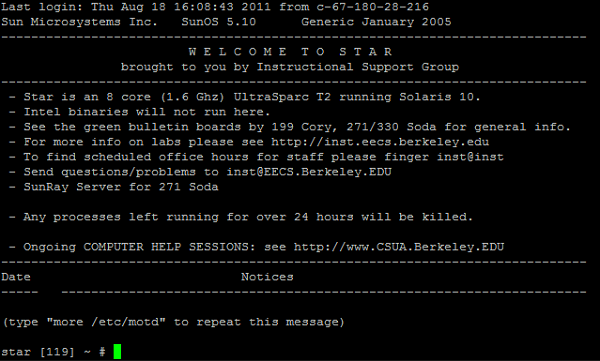
Figure 2: The terminal window.
This window is called the terminal - this is where you'll be
talking to the computer. You talk to the computer by entering in
commands. Here's a neat command - need to look up a date for this
month? Try the cal command by typing
cal into the terminal, then hitting enter:
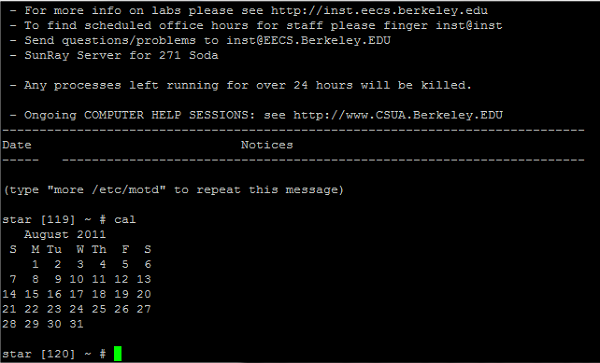
Figure 3: Your first command,
cal!
Neat, right? Turns out, these computers can do more than
displaying the current calendar - crazy, right?
You're going to want to change your password (the initial
passwords are not the most memorable creations).
To change your password, type
ssh update
in the terminal, and then hit enter. A password prompt will show
up - type in the initial password (i.e. the password on
your account form).
From here, use the arrow keys to navigate the menu, and follow
the directions to change your password.
Note: Please do not forget your login
information - especially your log-in name (i.e.
cs61a-ba). Memorize your log-in name, e-mail your log-in name to
yourself, etc. If you forget your password, you can
either e-mail INST at inst@eecs.berkeley.edu, or go to 333 Soda.
The most important thing to learn first is how to use the
filesystem. Unlike in Windows/MacOS, there aren't folders you can
click/drag/double-click. There's not even a 'My Computer' icon in
sight!
That's okay - we're going to learn how to do everything via the
command line (the command line is the terminal). Everything you did
on a visual-based filesystem (i.e. like those found on a
Windows/MacOS system), you can also do via the terminal.
First, I'll introduce you to our good friend,
ls.
ls is a command that lists all the files
in the current directory. Oh yes, and what's a directory?
A directory is just like a folder, e.g. the "My Documents" folder.
When you log in, you are automatically started off in the home
directory, so if we run the ls
command right now, it'll display all the files in our home
directory:
Try the ls command now!
star [121] ~ # ls
star [122] ~ #
Hm - nothing really happened. That's because there's nothing in
our home directory - we just made our account after all! Let's make
some stuff!
This leads to another good command: the
mkdir command.
mkdir is a command that makes a new
directory (hey now, the command names make sense!). Unlike
cal and ls, we
don't just type mkdir and press enter - we
need to specify the name of the folder we want to create! Since
we're well-organized people, let's create a new directory for this
lab, and call it lab1:
star [123] ~ # mkdir lab1
star [124] ~ #
When we supply extra 'stuff' to a command (like a folder name,
for instance), we say that we're calling the mkdir command with
parameter(s). Not all commands take arguments (recall
cal). Some commands even have optional
parameters (ls, for instance, has a
bunch of different optional parameters).
Okay, now that we've made our directory, let's make sure it's
actually there - use the ls command to make
sure that the lab1 directory exists.
star [125] ~ # ls
lab1
star [126] ~ #
Hey, there's our new directory! Awesome.
To get 'inside' the directory, we have a handy command called
cd.
cd (short for change-directory) is a
command that, when given a directory name as a parameter, takes you
into that directory. Enter the lab1 directory by typing:
cd lab1
star [126] ~ # cd lab1
star [126] ~/lab1 #
Note that the ~ turned into a
~/lab1. This tells you that you're
currently in the lab1 directory - the ~
stands for the home directory.
So we're inside the lab1 directory, but there's not much here.
You can ls to make sure that it's empty.
Let's say we want to go back to the home directory: there are two
ways to go back from here.
One way is to enter in the following:
cd ..
star [126] ~/lab1 # cd ..
star [127] ~ #
The .. is shorthand in UNIX for
"the parent directory". The home directory is the parent directory
of the lab1 directory (sincethe lab1 directory lives in the home
directory).
Alternately, you can type in just: cd
star [127] ~/lab1 # cd
star [128] ~ #
Running the cd command with no
parameters is equivalent to returning to the home directory. This
is handy when you're many directories deep, and you don't want to
keep repeating cd .. to get back home.
We've created them - now, we can destroy them! Er, remove them,
rather. Often, you'll find yourself wanting to delete directories
(say, to organize things). To delete a directory, we use the
rmdir command (short for remove-directory).
Like mkdir, rmdir
takes a directory name as a parameter. Try the following steps:
- Create a directory called my_folder
- Run ls to see that it's really there
- Remove the directory using rmdir
- Run ls again to see that it's not
there anymore.
star [129] ~ # mkdir temp_folder
star [130] ~ # ls
lab1 temp_folder
star[131] ~ # rmdir temp_folder
star[132] ~ # ls
lab1
Summary: We've learned about the following commands:
| Command |
Description |
| cal |
Displays the current month |
| ls |
Lists the current directory contents |
| mkdir |
Creates a new directory with a specified name |
| cd |
Moves into/out of directories |
| rmdir |
Removes the given directory |
We've done a lot of things so far, but only with directories -
we probably want to be able to actually have stuff in our
directories. So, let's make some files, and learn the commands to
manipulate them.
Our first step is to create a file. Notice the distinction
between files and directories. In UNIX, we tend to treat files and
directories separately - for instance, it makes sense to
cd into a directory, but it doesn't quite
make sense to cd into a text file!
Let's create a simple file that has the sentence: 'This semester
will be awesome!'
The command we'll use is called echo.
echo is a command that simply displays
anything you type after the word 'echo':
star [136] ~ # echo hello
hello
star [137] ~ # echo Stop repeating me!
Stop repeating me!
star [138] ~ # echo No, you stop!
No, you stop!
Some terminology - the words that the computer displays after
we hit the enter button is the output of the echo command. It's
sort of like this picture:
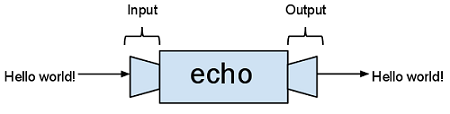
Figure 4: Visualization of input/output
of the echo command
UNIX has a very nice way to redirect output - with the
> symbol.
Let's say we want to redirect the output of
echo into a new file called my_file . We
can do this by doing:
star [139] ~ # echo This semester will be awesome! > my_file
star [140] ~ # ls
lab1 my_file
That was easy! We created a new file - to get a glimpse into
what's inside, we can use another command, called
cat.
cat is a command that displays the contents
of a given file:
star [141] ~ # cat my_file
This semester will be awesome!
To remove files, we use the rm command
- it works essentially like rmdir, but for
files. Use the rm command to delete the
my_file file:
star [142] ~ # ls
lab1 my_file
star [143] ~ # rm my_file
star [144] ~ # ls
lab1
Warning: Use rm/
rmdir with utmost care! Unlike in
Windows/MacOS, there is no friendly 'Recycle Bin' or 'Trash' where
you can restore a deleted file. In UNIX (at least on these systems),
when you rm a file, it's gone. Vanished.
Caput. There's no 'undo-ing' a rm - so,
think twice (and thrice!) before using the rm
command!
With directories, we were able to make and remove them. However,
for files, we can do even more!
Let’s go ahead and make a new file, because we have removed the
one we made in the previous section.
star [139] ~ # echo This semester will be awesome! > my_file
star [140] ~ # ls
lab1 my_file
Let’s say we wanted to make a copy of this file. Well we can use
the cp command.
cp takes two parameters, the first is the
name of the file you want to make a copy of, and the second is the
name of the new file you want to copy the first file into. For
example, if we wanted to copy my_file into a new and different file
called new_file, then we could do so as follows:
star [272] ~ # cp my_file new_file
star [273] ~ # ls
lab1 my_file new_file
If we were then to look at each file separately using the
cat command, we can see that new_file is
simply a copy of my_file. Exactly what we wanted.
star [275] ~ # cat new_file
This semester will be awesome!
Now a lot of times we will want you to copy a file from our
cs61a account into your own. We can use the
cp command to do so by specifying the
filepath, which will almost always be given to you. (For example,
something like “~cs61a/lib/shakespeare.txt” is the filepath for the
text file from our 61a account which contains a Shakespearean
sonnet).
star [276] ~ # cp ~cs61a/lib/shakespeare.txt shakespeare.txt
star [277] ~ # ls
lab1 my_file new_file shakespeare.txt
But here's a handy tip: if we put a period
'.' as the second argument to
cp, we get the same effect:
star [278] ~ # cp ~cs61a/lib/shakespeare.txt .
star [279] ~ # ls
lab1 my_file new_file shakespeare.txt
The '.' is a UNIX shorthand for
'current directory'. So,
cp ~cs61a/lib/shakespeare.txt . means:
Create a new copy of ~cs61a/lib/shakespeare.txt,
and put it in the current directory.
Similarly, if we wanted to, we could copy shakespeare.txt to
our lab1 directory by doing:
star [280] ~ # cp ~cs61a/lib/shakespeare.txt lab1
star [281] ~ # ls lab1
shakespeare.txt
We can also move a file to a different directory by using the
mv command.
mv takes in two parameters as well: the
first is the filename that we want to move, and the second is the
name of the directory that we want to move that file into.
star [275] ~ # mv new_file lab1
star [275] ~ # ls
lab1 my_file
star [276] ~ # cd lab1
star [277] ~/lab1 # ls
new_file
We just moved new_file into the lab1 directory. As you can see,
the lab1 directory is in the home directory, which is where the
new_file originally was. The name of the directory we are moving
the file into needs to be in the current directory, or else the
computer will not know what directory you are referring to, and
will instead rename the file (more on that later).
However, what if we wanted to move the file back into the home
directory; the home directory is not inside of lab1, so there is no
way to reach it right? No! Just like we could change into a parent
directory by calling cd with
“..” we can also move a file into
the parent directory by calling mv with a
filename and “..” as follows:
star [276] ~/lab1 # ls
new_file
star [278] ~/lab1 # mv new_file ..
star [279] ~/lab1 # ls
star [279] ~/lab1 # cd
star [278] ~ # ls
new_file
We have just moved new_file back into our home directory,
which was a parent directory of the lab1 directory.
Lastly, we can rename a file. In order to rename a file, we can
actually also use the mv command. In this
case, the mv command still takes in two
parameters: the first being the name of the file we want to rename;
however, the second is the new name for the file.
star [277] ~/lab1 # mv new_file best_name_ever
star [278] ~/lab1 # ls
best_name_ever
We have just successfully renamed new_file to be the filename:
“best_name_ever.”
| Command |
Description |
| cal |
Displays the current month |
| ls |
Lists the current directory contents |
| mkdir |
Creates a new directory with a specified name |
| cd |
Moves into/out of directories |
| rmdir |
Removes the given directory |
| echo |
Outputs user input. |
| cat |
Displays the contents of a specified file. |
| rm |
Removes the specified file. |
| mv |
Move a file to a new destination (can also be used to rename) |
| cp |
Copy a file to a new destination |
These machines come pre-installed with a variety of programs.
Two programs that you'll be frequently using over the semester are
Firefox and Emacs.
Firefox is a free web browser (like Internet Explorer, Safari,
Google Chrome, etc.). To open it, you can simply enter the program
name at the terminal and hit enter:
star [145] ~ # firefox
After a few moments, Firefox will open up in its own window.
Don't worry if it takes awhile - during the first week of school,
the servers are usually very busy, so programs like Firefox may be
slow at first.
One unfortunate side-effect of opening up Firefox like this is
that our terminal is now unresponsive to new commands:
star [145] ~ # firefox
ls
cd
helloooo
you're not working anymore :(
The terminal will only be responsive once you exit Firefox. To
avoid this situation, if you add an ampersand
'&' after firefox,
the terminal will still be responsive:
star [145] ~ # firefox &
star [146] ~ # ls
lab1
star [147] ~ # echo Hooray, you're listening to me!
Hooray, you're listening to me!
Whew! We've covered a lot so far, so let's recap what we've done
so far.
- How to use commands to navigate the filesystem
- How to create/remove directories
- How to create/remove/display files
- How to move/rename/copy files
- How to redirect output from one command to another
- i.e. echo This is my file > new_file
- How to run programs, and access the Internet with firefox
- To retain control of the terminal, insert an
'&' after the program name, as in:
firefox &
This is fantastic - definitely all of the commands you'll need
for the semester. However, we have yet to really create/edit/save
text files. And no, Microsoft Word is not installed on these
machines. But we have something better!
Emacs is a very popular free text editor, with quite a bit of
history behind it (it was created in 1976!). This is the text editor
we'll primarily be using this semester. However, it's definitely not
required - if you're more comfortable in other editors (e.g. vi,
nano, etc.), feel free to use those! However, we'll only be talking
about emacs here. Now, emacs may seem very intimidating and
difficult at first, but don't worry, we'll get you situated in no
time.
To help us keep track of what we're doing, I'm going to
explicitly state the goals for this section:
- Using Emacs, create a new text file called 'my_epiphany' in
the home directory, and type the sentence:
"This semester will be a pretty good semester."
- Then, using Eemacs, re-open 'my_epiphany', and edit it to
instead say:
"This semester will be a fantastic semester!"
So, let's start with opening up Emacs. It's important where you
open Emacs, because the directory in which you open Emacs determines
the directory that Emacs 'starts off' in. For instance, if I open up
Emacs in the home directory, and I saved a file called
'my_file.txt', then my_file.txt will appear in the home directory.
But more on that later!
Remember to add the '&' when opening
Emacs:
star [148] ~ # emacs &
A window something like this should open up:
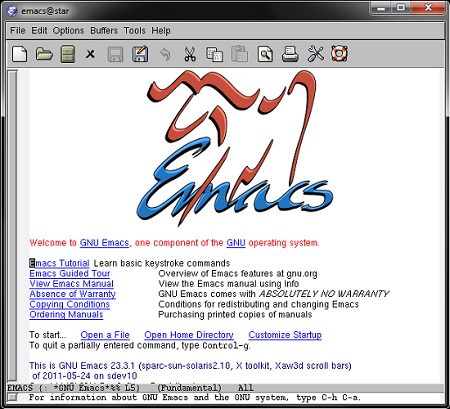
Figure 5: The emacs splash page
This is sort of the 'splash page' for Emacs - later, if you're
interested, you can check out the Emacs Tutorial, but let's not do
that right now. (It is a valuable resource for learning to use
Emacs, but it could take you years to complete! :p)
Now, let's create our new file - to do that, you can do any of
the following 3 options:
- Option 1: Click the 'New File' icon labeled here:
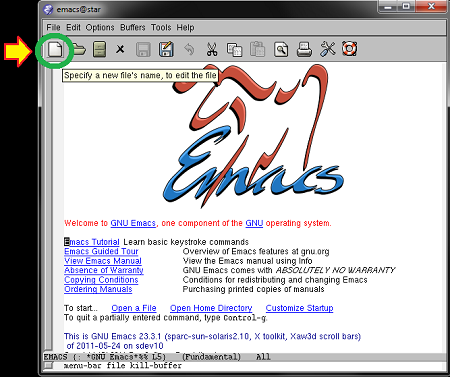
Figure 6: One way to create a new
file in Emacs
Once you have clicked that, a prompt will appear on the
bottom area (this is called the mini-buffer), asking for the
name of the file you wish to create. Type in 'my_epiphany' as
the file name, and hit enter.
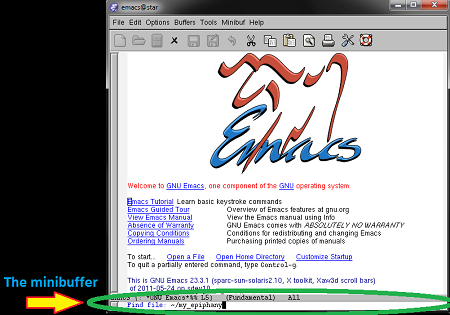
Figure 7: The mini-buffer
- Option 2: Go to File menu, and click on Visit New File...
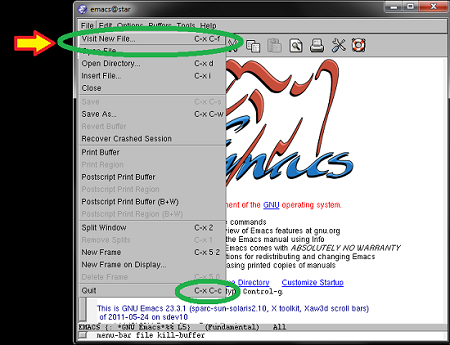
Figure 8: Yet another way to create
a new file in Emacs. Note that hotkeys are listed to the right
of menu items.
Once you've done that, a prompt will appear on the bottom
area (this is called the mini-buffer), asking for the name of
the file you wish to create. Type in 'my_epiphany' as the file
name, and hit enter. (See Figure 7 above to see what the
mini-buffer looks like).
- Option 3: Use the hot-key C-x C-f,
then type in 'my_epiphany' in the mini-buffer. If you're not sure
what C-x C-f means, then check out the
"Emacs Hotkeys" section. But for now:
C-x C-f is a two-step process:
- i) First, while holding down
Control (Ctrl), hit the
'x' key.
- ii) Release all keys.
- iii) Then, while holding down
Control (Ctrl), hit the
'f' key.
Now, the Emacs window should turn into a blank page - this is
the newly created my_epiphany file. Go ahead and type the sentence:
"This semester is going to be a pretty good semester."
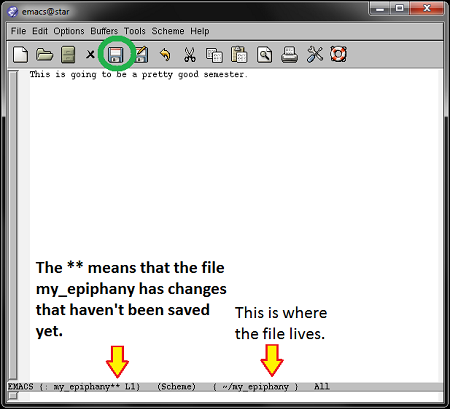
Figure 9: Our new file.
Now that we've added our sentence, let's save the file (either
by clicking the Save icon, doing
File -> Save, or doing the hotkey
C-x C-s). You'll know it's saved when the
two stars after the file-name go away (see Figure 9 to see what I
mean).
Now, exit Emacs (by doing File -> Quit
, or C-x C-c).
Congratulations! You've just created your first file in Emacs. We
can confirm that it does in fact exist by
cat-ing the file:
star [149] ~ # ls
lab_1 my_epiphany
star [150] ~ # cat my_epiphany
This is going to be a pretty good semester.
But wait! We want to edit that file - we want to instead say:
“This semester is going to be a fantastic semester!”
So, let's edit the file to say this instead. One way we could
do this is open up Emacs using emacs &, and
use the File -> Open (hotkey:
C-x C-f) to open up the file (typing in
my_epiphany in the mini-buffer):
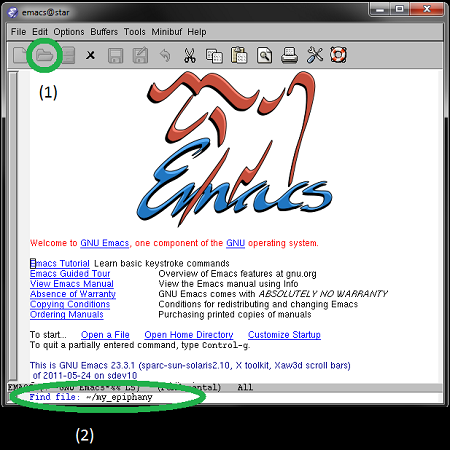
Figure 10: Opening a file in Emacs
Or, we can provide the name of the file as a parameter while
opening up Emacs:
star [151] ~ # emacs my_epiphany &
This does two things at once:
- i) Start Emacs
- ii) Open up the my_epiphany file
Now, modify the file to instead say "This semester is going to
be a fantastic semester!", save it, and exit Emacs.
cat the file to make sure that it worked.
star [152] ~ # cat my_epiphany
This is going to be a fantastic semester!
Helpful Tip: If the mini-buffer ever has a prompt
that you don't understand (say, you accidentally hit a command),
and you're not sure what to do, click the mini-buffer and do the
hotkey C-g. This will cancel the mini-buffer
prompt, and also cancel the command that was expecting the prompt.
In Computer Science parlance, an interpreter is a program that
lets you interactively 'talk' to a programming language. A Python
Interpreter is thus a program that lets you interactively talk to
Python. The best way to see what I mean is to try it out yourself!
Just like Firefox and Emacs, we can enter the Python interpreter
from the terminal. To do this, simply type
python at the terminal:
star [153] ~ # python
Python 3.2.1 (v3.2.1:ac1f7e5c0510, Jul 9 2011, 01:03:53)
[GCC 4.2.1 (Apple Inc. build 5666) (dot 3)] on darwin
Type "help", "copyright", "credits" or "license" for more information.
>>>
Now, you're talking to Python! The
">>>" signifies that the interpreter is
waiting for user input. So, when you type something in and hit
enter, Python will try to evaluate it. It's similar in spirit to
the UNIX terminal prompt, but instead of talking to UNIX, you're
talking to Python. Try typing in a few simple arithmetic
expressions.
>>> 1 + 2
3
>>> 7 * 8 - 9
47
>>> (1 + 2) * (3 - 4)
-3
Notice that you're actively talking to Python - hence, why it's
an interactive program.
We'll play around in Python more a little later in lab, so
let's get back to more Emacs fun - you can exit the Python
interpreter by doing either of the following:
- - Typing exit(), and hitting enter
- - Or, doing C-d
One of the great features of Emacs is the ability to
simultaneously edit a file and then immediately run it in a Python
interpreter. Since this is a Computer Science class taught in
Python, this is definitely a good ability to have up your sleeve
(hint: you'll be doing quite a bit of programming in this course).
Emacs has a feature called "Programming Modes" where the
behavior of Emacs changes depending on what programming language
we're currently working in. Some changes are purely aesthetic
(i.e. font changes, syntax highlighting), and others are more
practical (such as running an interpreter).
In order to activate the Python mode, we have to be editing a
Python source file - and you know what, we know how to create files!
Navigate to the lab1 directory, either:
- i) from within the terminal, and running a new Emacs
instance from within the lab1 folder.
- OR
- ii) from within Emacs by typing in “lab/” before you write
the filename
Note: If you don't have a lab1 directory in your
home directory, create it using mkdir.
Now, create a new file called greet.py - the .py file extension
is important, because:
- It's convention for Python source files to end in a .py
extension
- Emacs needs the .py at the end in order to activate the
Python mode
Let's write a very simple, sort-of-silly program that greets
you by name. Don't worry if you don't understand the program
(we'll learn what each of these pieces mean in more depth over
the next few weeks):
print("Hello world!")
my_name = "Eric"

def greet():
    print("Greetings", my_name, ", how are you today?")
    print("  - Python")
Now, your Emacs screen should look something like this:
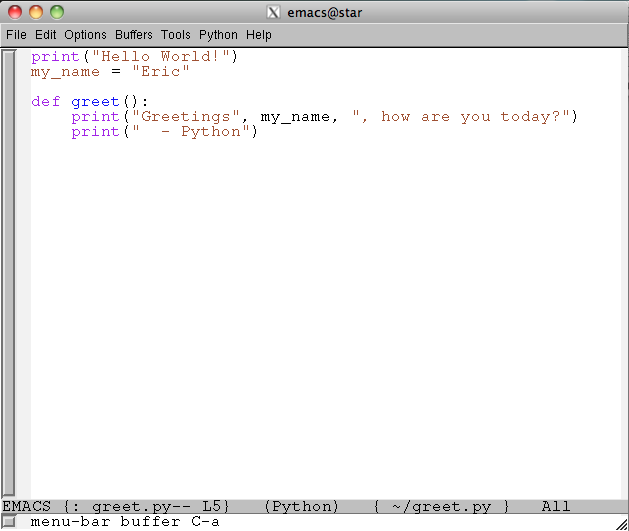
Figure 11: Our simple greet.py program.
Here's the cool part - open up the Python interpreter by either:
- i) Going to the menu, and doing
Python -> Switch To Interpreter
- OR
- ii) Hitting the hotkey C-c !
(that’s Control-c Shift-1)
The Emacs window will now split into two buffers - the top
buffer being your greet.py file, and the bottom buffer being the
Python interpreter! The Python interpreter should give you the
Python prompt: “>>>”
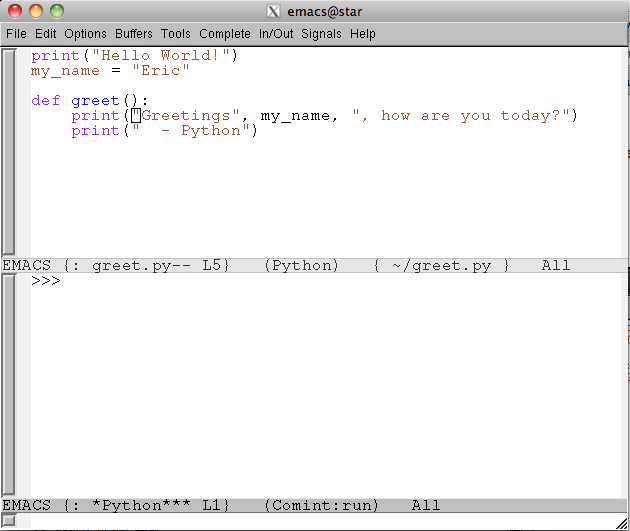
Figure 12: Python within Emacs
The menubar (File,
Edit, Options,
etc...) changes depending on which buffer is active, i.e. which
buffer you're currently editing/on. To change the active buffer,
just click on the buffer you want to be active. For instance,
since my cursor is in the Python interpreter in Figure 12, the
menu has items like Errors,
Complete, In/Out,
and Signals. But if I click on the greet.py
buffer, the menu will have the Python
menu item.
Just like in Section 10, you can talk directly to Python in the
interpreter by typing in commands after the prompt. But we can
also "send" the code we have written in greet.py to the Python
interpreter!
To do this, make sure that the greet.py buffer is active
(by clicking on the buffer) and then either:
- i) Click on the menu item
Python -> Eval buffer
- OR
- ii) Do the hotkey C-c C-c
You'll know it was successful when the Python interpreter
responds with a Hello World!
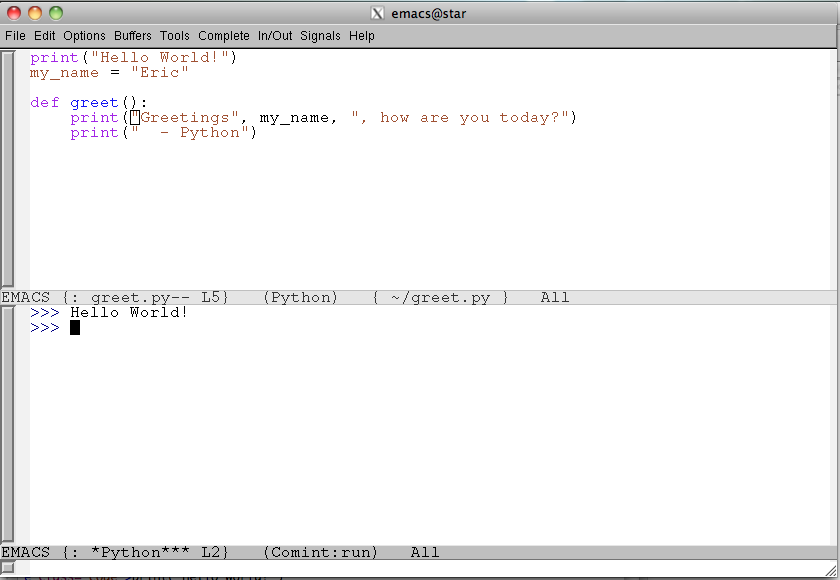
Figure 13: Loading your greet.py file
When you did 'Eval buffer' (i.e.
Control-c Control-c), Python
acts as if you had typed every line in greet.py into the
interpreter, line by line. That's why the
"Hello world!" appears,
since the Python interpreter is evaluating the first line in
greet.py: print("Hello world!)"
greet.py also defines two things: a
my_name variable (bound to the value
"Eric"), and a function
greet that, when called, greets a person
(signed by Python, nonetheless!). To make sure it works, do
the following in the Python interpreter:
- 1.) Get the value of my_name
by typing my_name, then hitting enter
- 2.) Call the greet function by
typing greet(), then hitting enter
If you did it right, your screen should look something like
this:
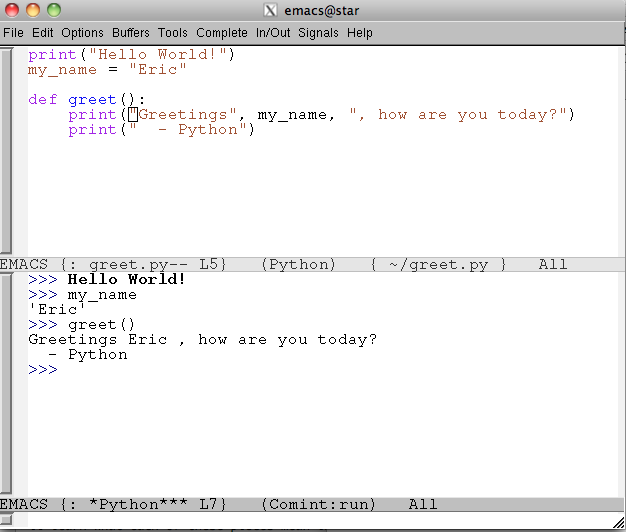
Figure 14: Running our
greet function
Great, it works! However, right now it's currently greeting me
- we probably want it to greet you! Go edit the greet.py file, and
change the value of the my_name
variable to instead be your name.
For example, if your name is Stephanie, greet.py should look
like:
print("Hello World!")
my_name = "Stephanie"

def greet():
    print("Greetings", my_name, ", how are you today?")
    print("  - Python")
Save greet.py, then re-send the greet.py file to Python by doing
'Eval buffer' (hotkey:
C-c C-c). Then, call the
greet function again by typing
“greet()” at the Python prompt
“>>>” to make sure the name was changed!
Congrats! You've completed your first typical work-cycle: edit
a file, run it, edit it again, run it again, etc. This will start
feeling natural as the course progresses (and as you get further in
your CS career!).
If you watch a pro Emacs user work in Emacs, you'll notice that
he/she never uses the mouse to do anything - everything he/she does
is via hotkeys.
A hotkey is just a combination/sequence of keys that, when
performed, does some action. For instance, you're all probably
familiar with the copy and paste hotkeys:
Ctrl-c, and Ctrl-v
respectively.
Emacs has a wide variety of hotkeys - pretty much any action can
be done with some sort of hotkey. For instance, the hotkey
C-x C-s will save the current buffer/file.
But let's see how to actually perform these hotkeys:
- C-x means: while holding down the
Control (Ctrl) key, press the
x key.
- C-s means: while holding down the
Control (Ctrl) key, press the
s key.
C-x C-s is two actions, one after
another:
- i.) First, do C-x
- ii.) Then, release both keys.
- iii.) Finally, do C-s
Some hotkeys involve the Meta key, such as this hotkey that
opens up a Scheme interpreter:
M-s
On the keyboards in the Soda labs, the Meta key is the key with
the "diamond", usually next to the spacebar.
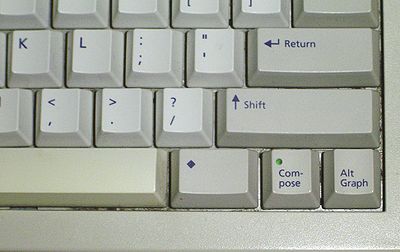
Figure 15: The Meta key is the key next
to the space bar
So, when you're doing hotkeys involving the Meta key, use this
"diamond" key just like any other key.
However, most keyboards don't have the Meta key - so, you can
also use Esc as a "sort of" Meta key. The
difference is, you first press the Esc key,
then you hit the next key: for instance, to do
M-s, you don't hold
Esc while pressing
s - you can just do:
- First press the
Esc key
- Then press the
s key
So, if you're using Emacs with a keyboard that doesn't have the
Meta key, you can always use the
Esc key.
| Hotkey |
Description of what it does |
| C-x C-s |
Save your file. |
| C-x C-f |
Open a file. If the filename you provide in the minibuffer
doesn't exist, then Emacs will create a new file for you. |
| C-x d |
Open a directory |
| C-_ |
Undo. (The '_' is an underscore,
so you'll probably have to use Shift
also) |
| C-w |
Cut the highlighted region of text. |
| C-y |
Paste text. |
| M-w |
Copy the highlighted region of text. |
|
| C-g |
Cancel a command (useful if you accidentally did a command,
and the mini-buffer is prompting you for something). |
| C-x C-c |
Exit Emacs |
| Command |
Description |
| cal |
Displays the current month |
| ls |
Lists the current directory contents |
| mkdir |
Creates a new directory with a specified name |
| cd |
Moves into/out of directories |
| rmdir |
Removes the given directory |
| echo |
Outputs user input. |
| cat |
Displays the contents of a specified file. |
| rm |
Removes the specified file. |
| mv |
Move a file to a new destination (can also be used to rename) |
| cp |
Copy a file to a new destination |